3D has progressed a long way since the days of the funky blue green glasses many still associate with life in the third dimension, a good 3D photograph can be a thing of beauty, adding depth and presence to its subject, or it can make you reach forward to try and grab inside of it.
With many of us having 3D televisions, computers or portable 3D devices such as the Nintendo 3DS it makes sense that we'd like to take our own 3D pictures, but then to do that we need a high end expensive 3D camera. Right?
Well, no, you can do it for free with the phone or camera you have right now.
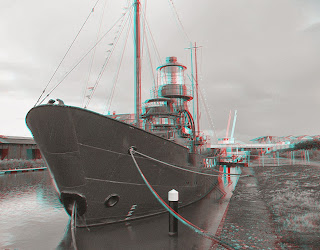
Let's just jump straight in and explain how. For this example we will use a location where not many people are around. The anaglyph example image shown here was actually my first try a few years ago at doing this with a 2D camera but it serves as a good example of what even a novice can achieve on their first try.
Pick a location, or just snap a pic of your laptop or tv, after all it is just to show you how its done.
Take a picture with your choice of digital camera, it doesn't matter whether it is a dslr, phone, tablet, etcetera, just snap one pic then, keeping the camera at the same height move it an inch or so to the right and snap another picture.
There are two easy ways to make the two pictures into 3D, we will look at both here. The most convenient for Android or iOS users is likely to be the free 3Dsteroid / i3Dsteroid app, but first let's check out the method you can use if you have a Windows laptop, tablet or desktop pc.
Stereo Photo Maker is a great, fast all in one tool for making your 2D image into 3D...it can also convert 3D pictures into various alternative 3D formats but we're using it here for its ability to combine two images together.
Click the link above and you'll see, at the top of the web page it opens, a link to download the 3D software. It's really easy, just click the download link on that page and it downloads a zip file to your pc.
Navigate to that folder using Windows explorer and right click your mouse over it so a menu pops up and from there choose the unzip or unpack option (on some computers it will say unarchive or extract).
Unzip the content anywhere you like. It is an executable file (exe), no installation needed - from now on any time you want to use the program simply double click the exe and the software will open (I have it on my desktop as a shortcut).
First things first, get the two pics you took and put them on your computer. If you used a phone you can either plug it in to your pc and transfer the files that way or, if you used a camera, remove the memory card and put it into your pc's memory reader slot (if your pc does not have one they can be bought at many retail outlets and typically cost around five pounds).
Run the windows program program you extracted earlier (called StereoPhotoMaker) and from its FILE menu click "Open Left / Right images". Find the first picture you took and click OPEN or double click the image.
This loads that image in as the left eye view, repeat the process for the second image which we will use as the right eye view. From the softwares STEREO menu click on the type of 3D image you want to make (unless your computer is 3D the best option is to choose Anaglyph and use those funky 3D glasses while editing your picture, you can always change the output format before you save the finished 3D image later).
From the programs ADJUST menu click on "Auto Adjust". It will take a few seconds to analyse the two pictures and then automatically line them up so they make one 3D image, even if the pictures you took were way too far apart this process is good enough to compensate somewhat for that and produce a good true 3D image.
If you want to make the 3D even more pronounced you can do that easily by clicking the ADJUST menu and from there choosing the "Easy Adjustment" option which will let you move the two images closer or further apart to increase or decrease the 3D effect, among other things.
When you are ready to save your image it's easy, just click the FILE menu and choose "Save Stereo Image".
A save box opens up, simply type in a name for your 3D picture and click save to save the image in the format you have been editing it in (eg anaglyph, side by side 3D, etcetera) or if you want to save in standard side by side (sbs) 3D format (the sort almost all 3D devices can display) make sure the save box's "always save sbs format" checkbox is ticked and that way, whatever format you work in, it will still save in side by side format. Otherwise remember to change the 3D format to your chosen one from the STEREO menu before saving.
And there you have it, you have made a 3D photograph. Taking two images with a normal 2D camera has its disadvantages, namely that sometimes if you have reasonably fast objects moving in the foreground or background then they will appear slightly different in each shot.
While you can edit these in free photo editing software such as the Gimp before making them 3D there is a much easier way if you own one of the Samsung devices such as the Galaxy S4 or Note whose camera features an Eraser mode.
If you have such a device, choose Eraser mode before taking your shot and the camera will edit out the moving objects in your pictures. The down side of this is that, unlike normal camera modes, you have to review the picture and click save when you take it.
This can mean your cameras point of view changes a bit between shots, such as being higher in one than the other, but that isn't a problem because the Stereo Photo Maker software will automatically adjust for that and crop your pictures accordingly as needed.
Eraser mode is surprisingly good and in a quick test of it I was able to shoot in the heart of Cardiff at rush hour with plenty of passing traffic and pedestrians and have it remove almost all the moving objects other than a couple of pedestrians. Thankfully the pedestrians were not moving fast enough to ruin the 3D image.
Android and iOS users have an additional free way to do all this, even more easily, on their phones or tablets.
3DSteroid is an excellent free Android application that can take any two images and do exactly what the above Windows software can, only even more easily.
Its iOS counterpart (by the same developer) can be found
here.
The free version on each has a few limitations, the paid for version has additional features and is recommended for fans of 3D as it is literally without equal as there is no competing application that offers its abilities other than of course on home computers running Windows.
While this approach works best with landscapes, buildings and somewhat stationary objects the increasing amount of devices featuring an Eraser mode for moving objects (currently mainly those manufactured by Samsung) means that even busy locations and scenes can be shot in 3D using a 2D camera.
The eraser mode works best in scenes where a few cars or people are moving but can handle even city scenes at rush hour surprisingly well so don't be afraid to give it a try. The beauty of this approach, coupled with a camera that can remove moving objects, is that it is now possible to shoot high quality 3D images with your mobile phone thanks to the increased quality of camera phones and the advances in technology within them.
And if rumours that the upcoming Nexus 5 will use a mems lytro like camera are true the future of 3D photography on smartphones and tablets can only get better, the mems camera allows the image to be refocused even after it has been taken - meaning you can take two images and refocus them any way you like before you make them into 3D.
3D is not, as many claim, a dying format. It has been around for as long as photographs have existed and will exist far longer than any of its critics, eighteen percent of tv's sold last year were 3D models and analysts forecast that within the next few years this figure will increase to 3 in 5 televisions sold being 3D.
So, if you have a hankering to try 3D for yourself, you now have a way to do it for free. But be warned, 3D photography can sometimes be addictive.
 Sidebar pops open a customisable sidebar menu on the left or right side of your Androids screen. This menu hides until you choose to open it with a quick swipe.
 Some devices, such as The Samsung Galaxy S4, will need the sensitivity set to high - this can easily be done in the apps preferences menu, which can be accessed by running the application at any time, if you find you can't get the sidebar to show make sure to set the sensitivity to high.